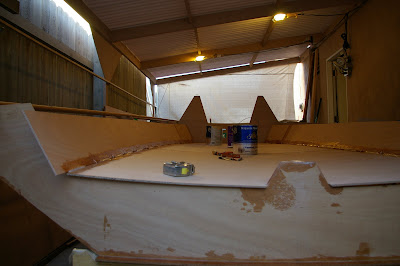
Cockpit sole and sides fitted, zip-tied, and lightly tabbed. I pulled the zip ties out later, sanded the temporary tabbing, ran full size fillets, and full length tape. Things that may be noticed here are a little spring/curvature to the sole, as well as the sides stopping 1 1/2" below the deck for the 2" radius curve that will go there.
Next, I made some spreader boards and a central strongback to hold the cockpit in position as I removed it from the boat. I laid out some lines for some tape reinforcing where I think it will be difficult to work from below, then added glass tape, some kevlar around the keel box, and biax along the outer "chine", and a sealer coat of neat epoxy. I ordered my main traveler track so I can add the appropriate reinforcement for the bolts- I'm planning to use little squares of G10 tapped for the threads, bonded to the sole bottom. There'll be an extra layer of glass in there, and the holes through the sole need to be overbored and filled as well. All that will be much easier now than later...
Just a close up of the end of one of my intermediate stiffeners, filleted and tabbed.
The aft two frame bays are clear coated. I left an uncoated margin at the edges so that the chine and hull side panel tabbing will be onto fresh wood, although I don't know that it's really needed.
Next up I'll mill up some 3/4" triangles to add to the tops of some of these frames where taping them to the cockpit sole will be difficult. I need to install some fairlead bullseyes for some underdeck rigging before things get too far along, mill up the cockpit radius foam, drop in and glue/fillet/tab the cockpit sole, and finally install the side panel stringers that have been sitting on the deck for a few months now, it seems. My shear clamp is just zip-tied in place now as well, so it needs to be tabbed in.
I keep thinking I'm close to putting those side panels on, then I think up all the little things that I need/want to do first.


.jpg)


I wish I could make such a neat/clean boat as you because when I do it there is always epoxy everywhere.
ReplyDeleteI'm pretty sure I'm not doing anything special to be neat... are you wetting out your cloth tapes on a separate table before placing them into the boat? That helps a bunch with neatness.
ReplyDeletemy tape process is 1) paint on a coat of resin on the part where the tape will go 2) add the fillet while #1 is still wet or green 3) wet out the precut glass on a table - a 2x6 covered with plastic in my case 4) peel up and roll or fold the glass into a reasonable carrying package- I have about 15 steps from table to boat 5) press one end or corner (already relief cut) into the still tacky/green fillet and smooth the tape down along the fillet line with a double-gloved finger (long sleeves are helpful as well) 6) use a bubble-buster roller to roll the tabs flat, being careful to mostly "push" the tape in toward the fillet, rather than pulling it outward- sometimes more use of the double gloved fingers works as well, especially in the corners. Note that the left over resin (with slow hardener) on the wet-out table from a prior piece of tape gets used by the next piece, greatly reducing waste. Using a spreader to wet out the glass instead of a brush helps reduce the resin content so there are very few dribbles after the glass is applied.
Does that help at all?
Thank's alot. Oh i'm not currently building an i550 only models but it dose actually make it easier. Hope to start building one soon though.
ReplyDeleteGet on it, already!
ReplyDelete(Are you the guy in Missouri that built the i550 model, by chance? I'm moving there in 18 months or so...)
No but i'v seen it and it's pretty sweet!
ReplyDelete